Xero is a powerful online accounting software solution, and with the Paystack integration, you can now use Paystack as a payment provider to accept invoice payments in Nigeria, Ghana, and South Africa.
Here's how to set it up and get started!
1. Go to ⇒ https://xero.paystackintegrations.com/login

2. Click on the "Sign in with Xero" button. This will redirect you to Xero's login page and once you've signed in with your user account, you'll be asked to grant Paystack some permissions required for the app to work.

3. Click to allow access.
4. Once you've granted access, you'll be redirected to the configuration page to set up your integration.
First, you need to set up your Accounts — select the accounts that will be used to reconcile your Paystack payments in Xero. We've created an account you can use for your Paystack fees, and this will be selected by default but you can change it if necessary.
You'll also need to select your Payout Account. This should be the bank account your Paystack payouts are deposited in. If you don't have your Paystack payout account created in Xero yet, follow this guide to create the bank account, and come back to the Xero-Paystack configuration page to choose the created account.


5. The next step is to activate Paystack for your invoice branding themes. When enabled, the "Pay Now" button on your invoices will take your customers to a Paystack payment page to complete their payment.


6. Once this is done, you'll see Paystack set as the payment service in your Xero invoice settings.

7. The last thing to configure is your API Keys. You can get these from your Paystack Dashboard.

You can also use your test keys to test the app, but be sure to switch to your live keys when you're ready to accept payments.

8. Copy your secret and public API keys from your dashboard and paste them into their respective fields.
Save changes, and voila! You're all set up to accept payment for your invoices using Paystack.
Sending Invoices with the "Pay with Paystack" option
Now that you're all set up, you can now send invoices with the option for your customers to pay with Paystack.
When you create an invoice and fill in all the details, the Paystack option is enabled by default.

You can confirm this by clicking on the "Manage online payments" button.

You'll see a modal with Paystack already checked, but in case it's not, select the option and click done.
With this enabled, your customers will have the Pay with Paystack option on their invoices.

Reconciling transactions, fees, and payouts.
There are three accounts in Xero that keep records of all transactions done via Paystack.
- Paystack Clearing Account - This is a bank account created automatically by Paystack when you set up your integration. It records all transactions, fees, and payouts.
- Paystack Fees Account - This is an expense account used for tracking all transaction charges for Paystack transactions. The default account used is automatically created and called Paystack Fees, but you can change this on the configuration page
- Payout Account - This is the bank account used for recording payouts made to your business by Paystack. The bank account to be used can be selected on the configuration page
When a customer makes a payment on an invoice, this is instantly recorded as a credit in the Paystack Clearing Account and auto-reconciled. Payments throughout the day will continue to accrue in the clearing account.
On the next settlement day(see When will I receive my payouts to confirm the settlement schedule for your business), between 1:00 AM to 3:00 AM GMT, all payments recorded are summed up and a bank transfer of the total amount, minus transaction fees is made from your Paystack Clearing account into the Payout account you're selected.
The transaction fees are recorded as a debit in the Paystack clearing account, and as a credit in the Paystack Fees account. This is also auto-reconciled.
The bank transfer created for the daily payout is recorded as a debit in the clearing account, and as a credit to the payout account.
When you receive the credit notification in your bank account, you'll need to go back to your Xero dashboard to reconcile the transfers.
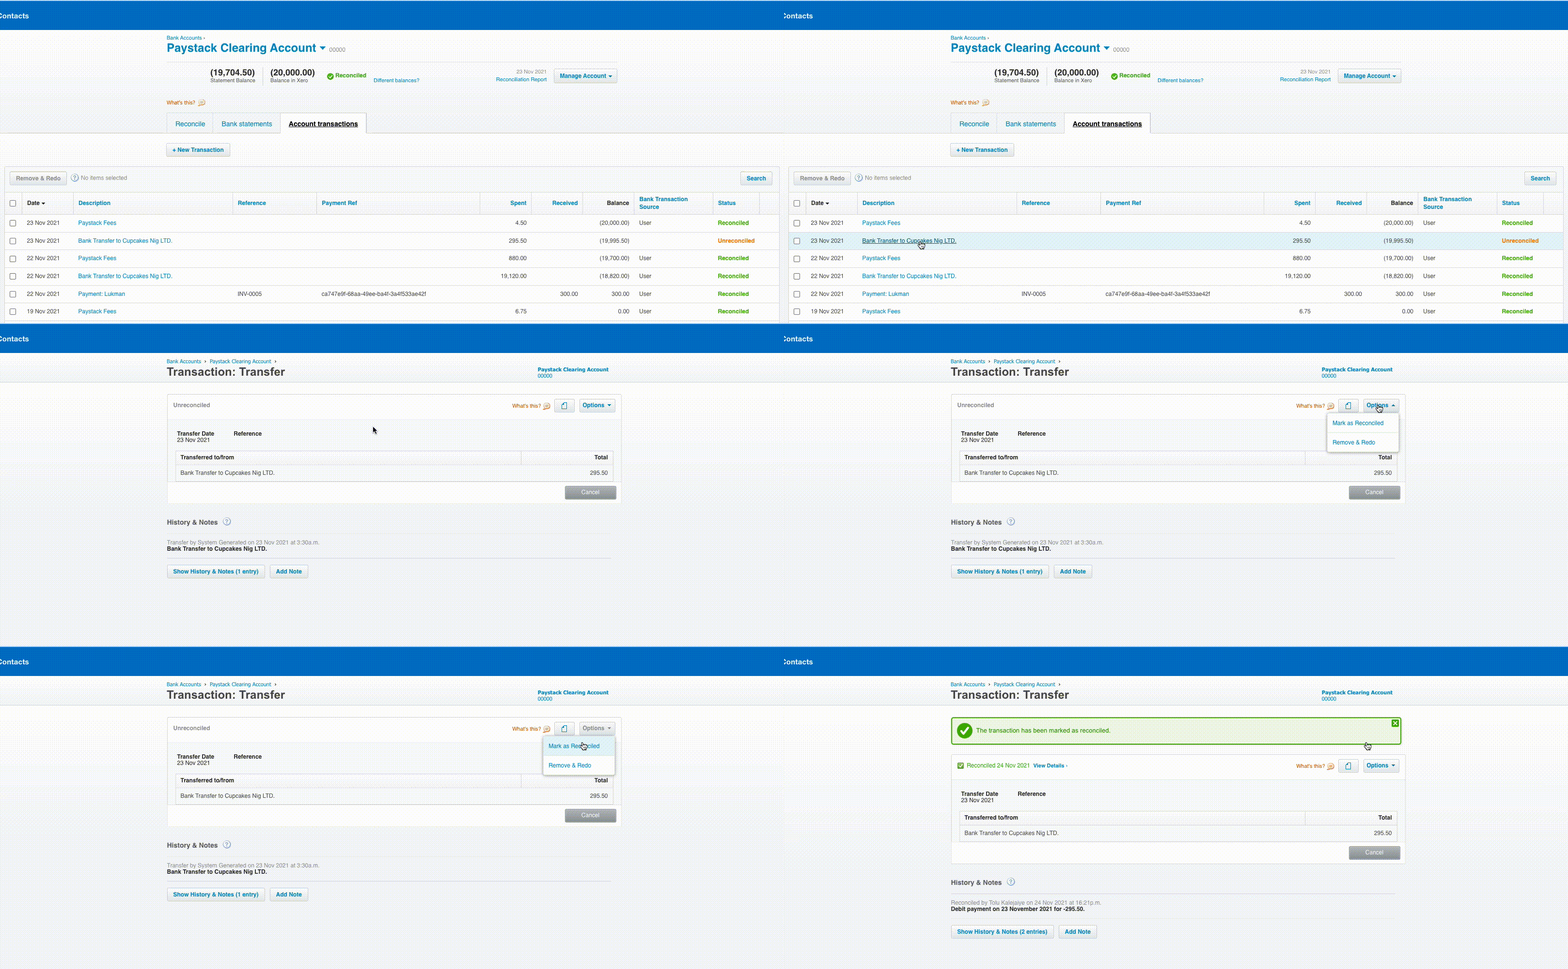
To do this, under the Accounting menu, click on Bank Accounts, then select Paystack Clearing Account. Here — you'll find a line item with the description Bank Transfer to {Payout Account}, click on that item.
This will take you to a page showing the details of the transfer. In the top-right menu, click on Options, then Mark as Reconciled.

Next, you'll have to reconcile the transfer line item in the payout bank account.
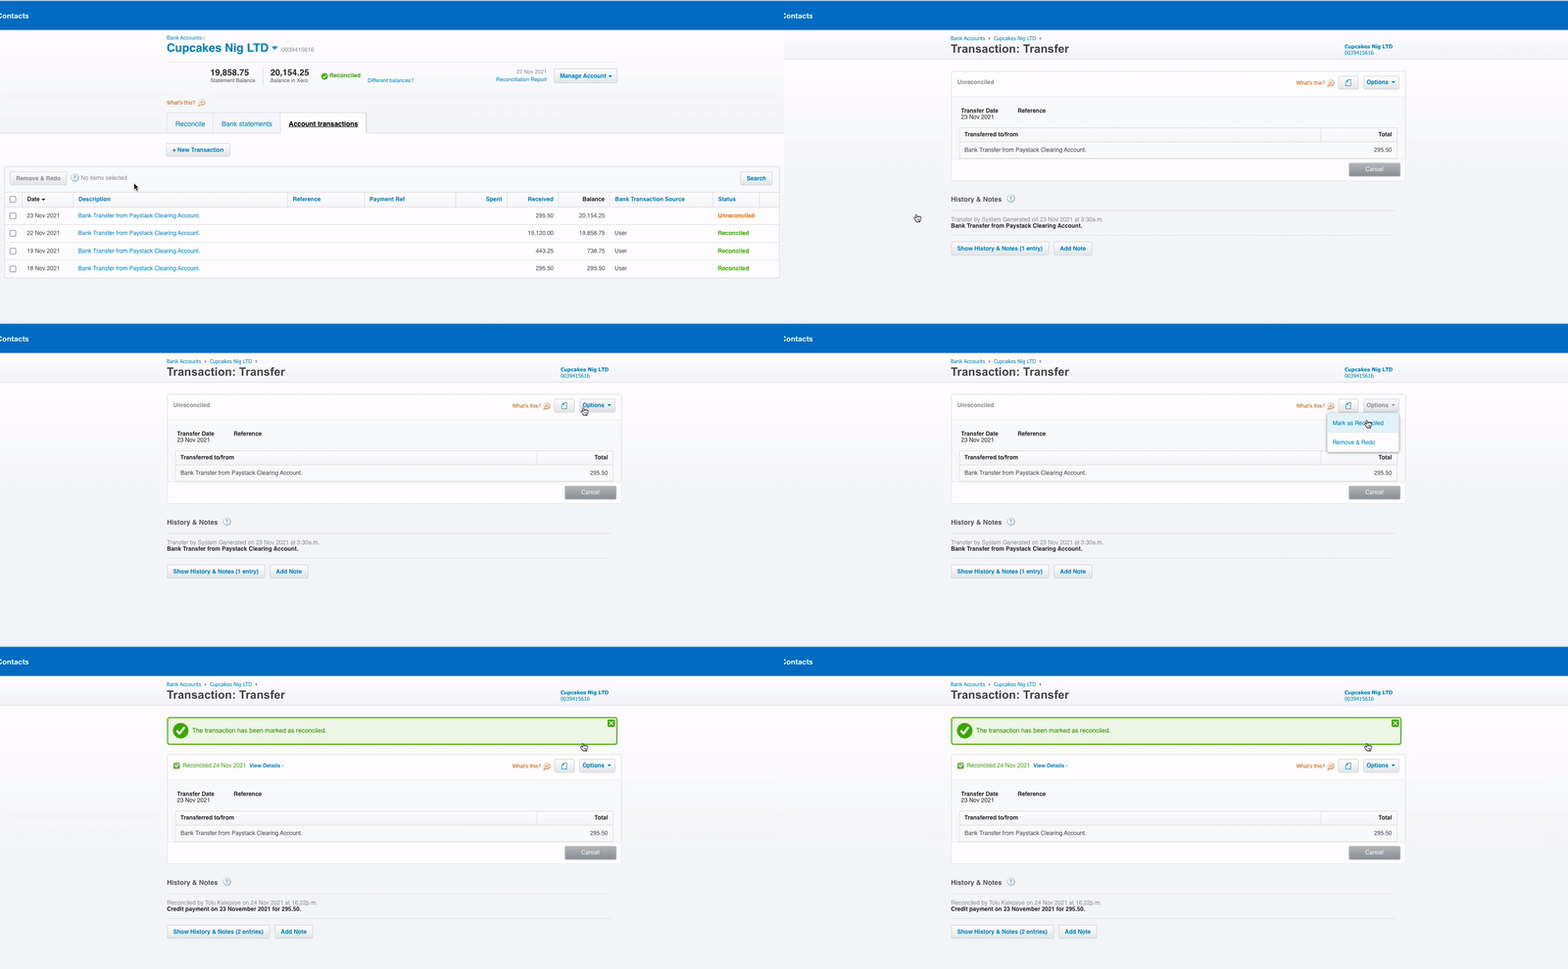
Go back to Bank Accounts, then select your payout bank account. Here — you'll find a line item with the description Bank Transfer from {Paystack Clearing Account}, click on that item.
This will take you to a page showing the details of the transfer. In the top-right menu, click on Options, then Mark as Reconciled.

That's it, your account is reconciled!

Comments
0 comments
Article is closed for comments.