On Paystack, a Product is a single item or service that your business sells. You can sell one product using Product Links, or sell multiple products at a time using Products on Payment Pages.
The Products Page
On the Products Page, you can see a list of all the products you wish to sell from your Paystack Dashboard. You can get here by clicking Products on the left sidebar on your dashboard.
Here are a few ways you can interact with the Products Page:
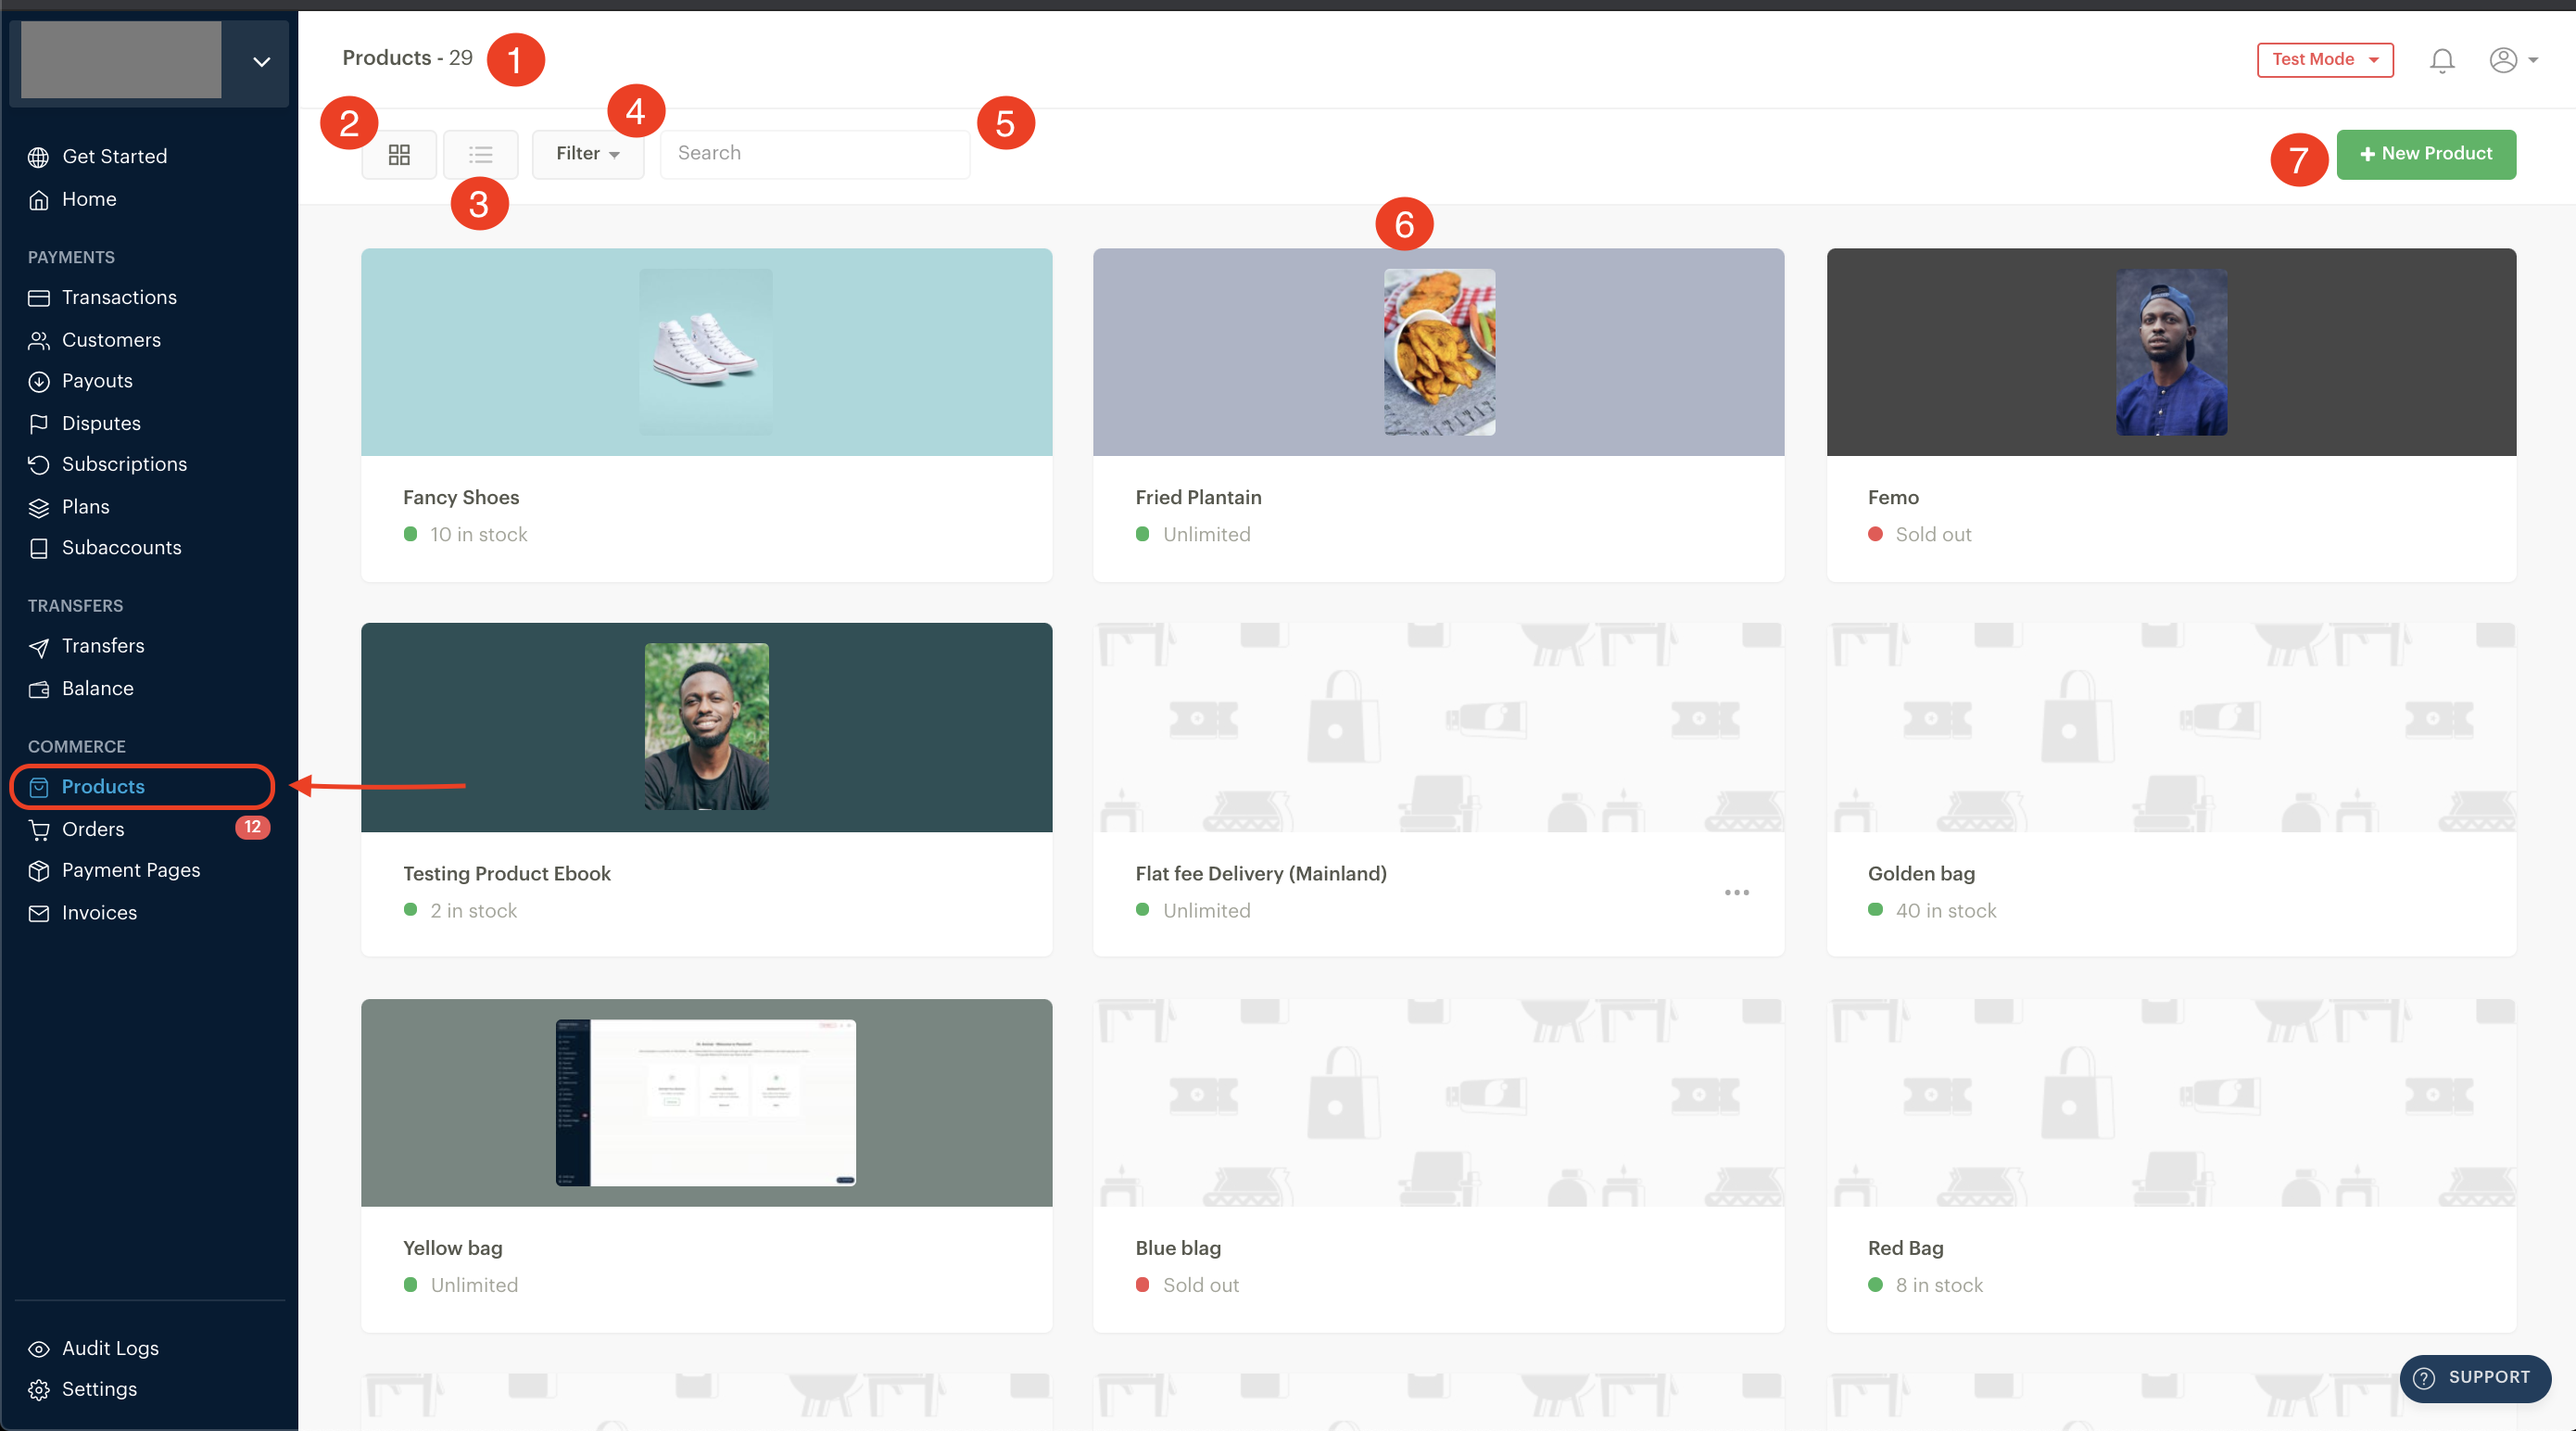
- Products: This shows how many products you have listed on your Products page
- Grid View: This presents your products in grids or cards
- List View: This presents your products in vertical lists
- Filter: You can filter your products by different views such as Status, Quantity, stock levels, Price and Creation Date
- Search: You are able to search for a product
- Products: This shows a list of all the products you have created
- New Product: This is where you create or add new products
A Product in detail
If you click on a particular product, you are able to get more information on that product, and even track specific metrics for the product.
This is what you see when you click on a product:
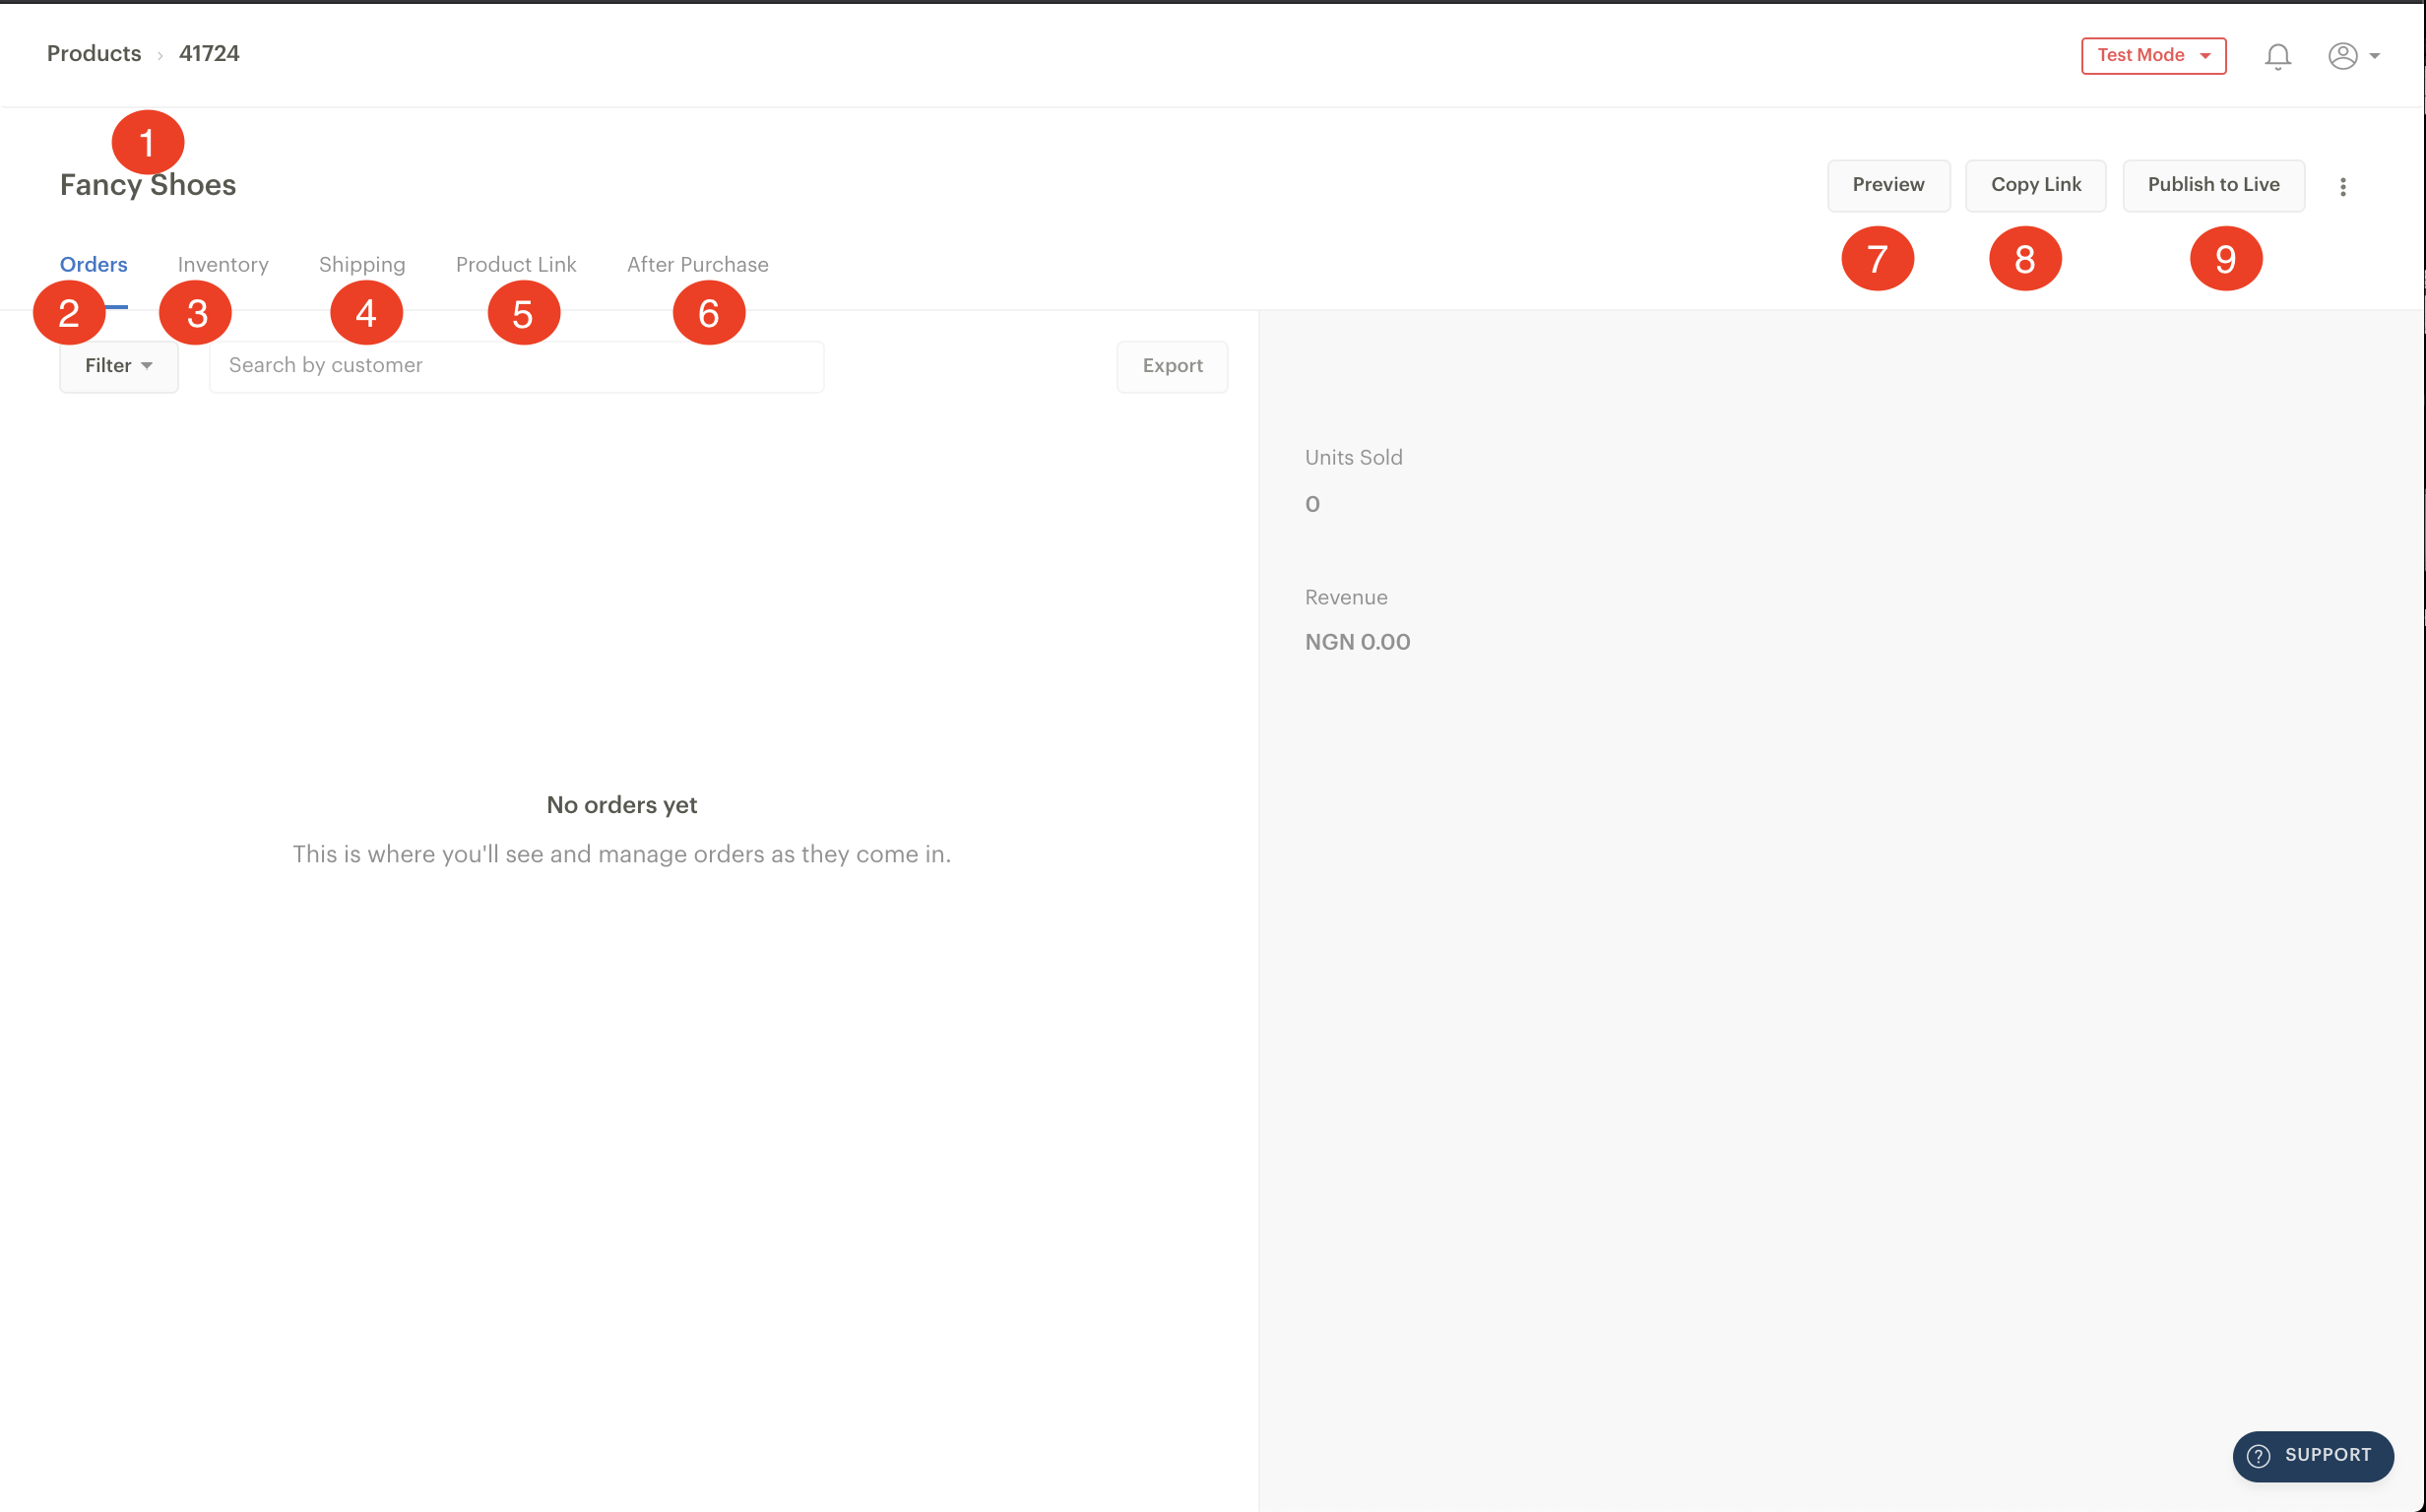
- Product Name: This is the name of your product
- Orders: Here you can view and manage your product orders
- Inventory: This is where you manage your product inventory or stock levels as well as the price of the product
- Shipping: You can edit shipping preferences for your products here. This is where you set shipping regions, shipping fees, delivery note etc
- Product Link: This is where you edit details about your products. These include Product Name, Description, Product URL, and status
- After Purchase: Here you can set what happens after your customer is able to pay for the product
- Preview: You can preview your Product Link
- Copy link: This is where you copy a direct link to your product, which can be shared with a customer to purchase it
- Publish to Live: This lets you move Products Links created in Test Mode to Live Mode
There are 5 sub-tabs under a Product Page. Each of these would be discussed in details below.
1. Orders Page
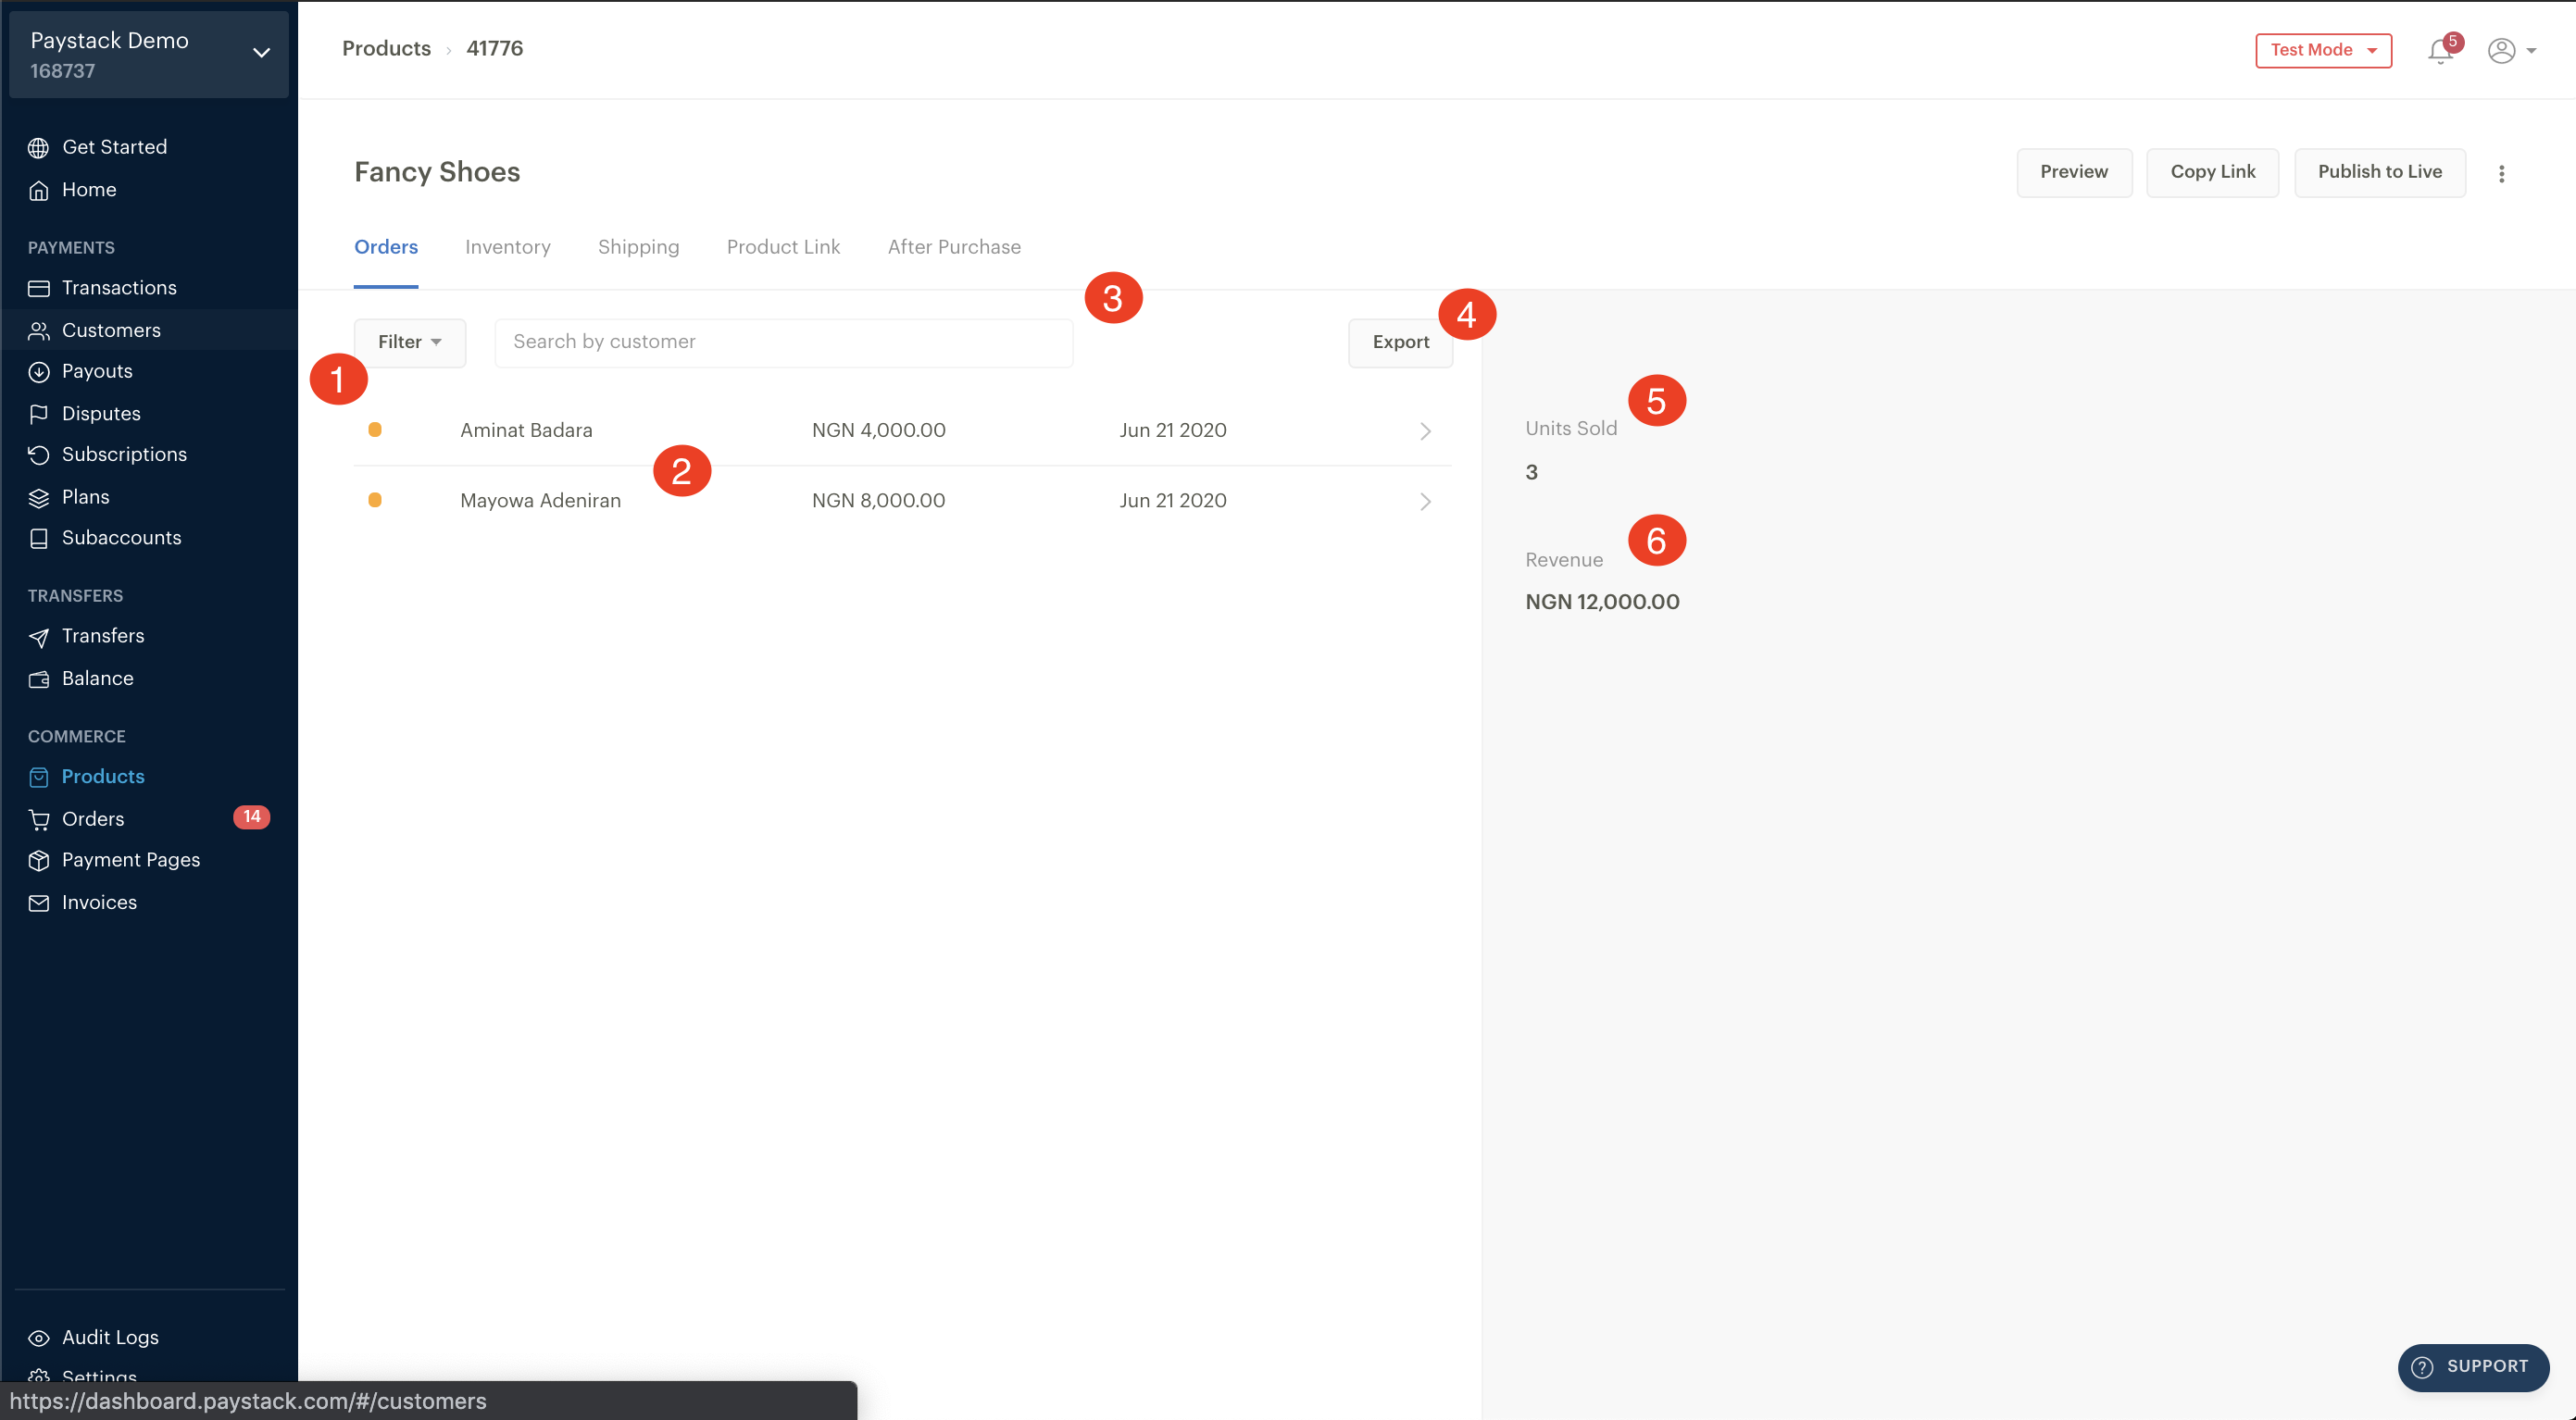
- Filter: Here you can filter your orders by different views
- Customer details: This shows details of customers that have made payments for the product you're viewing
- Search by customer: You are able to search for customers by name
- Export: You are able to export the order and customer details for your product here
- Units sold: Here is the number of this product that has been sold
- Revenue: Here is the total revenue you've generated for this product
2. Inventory
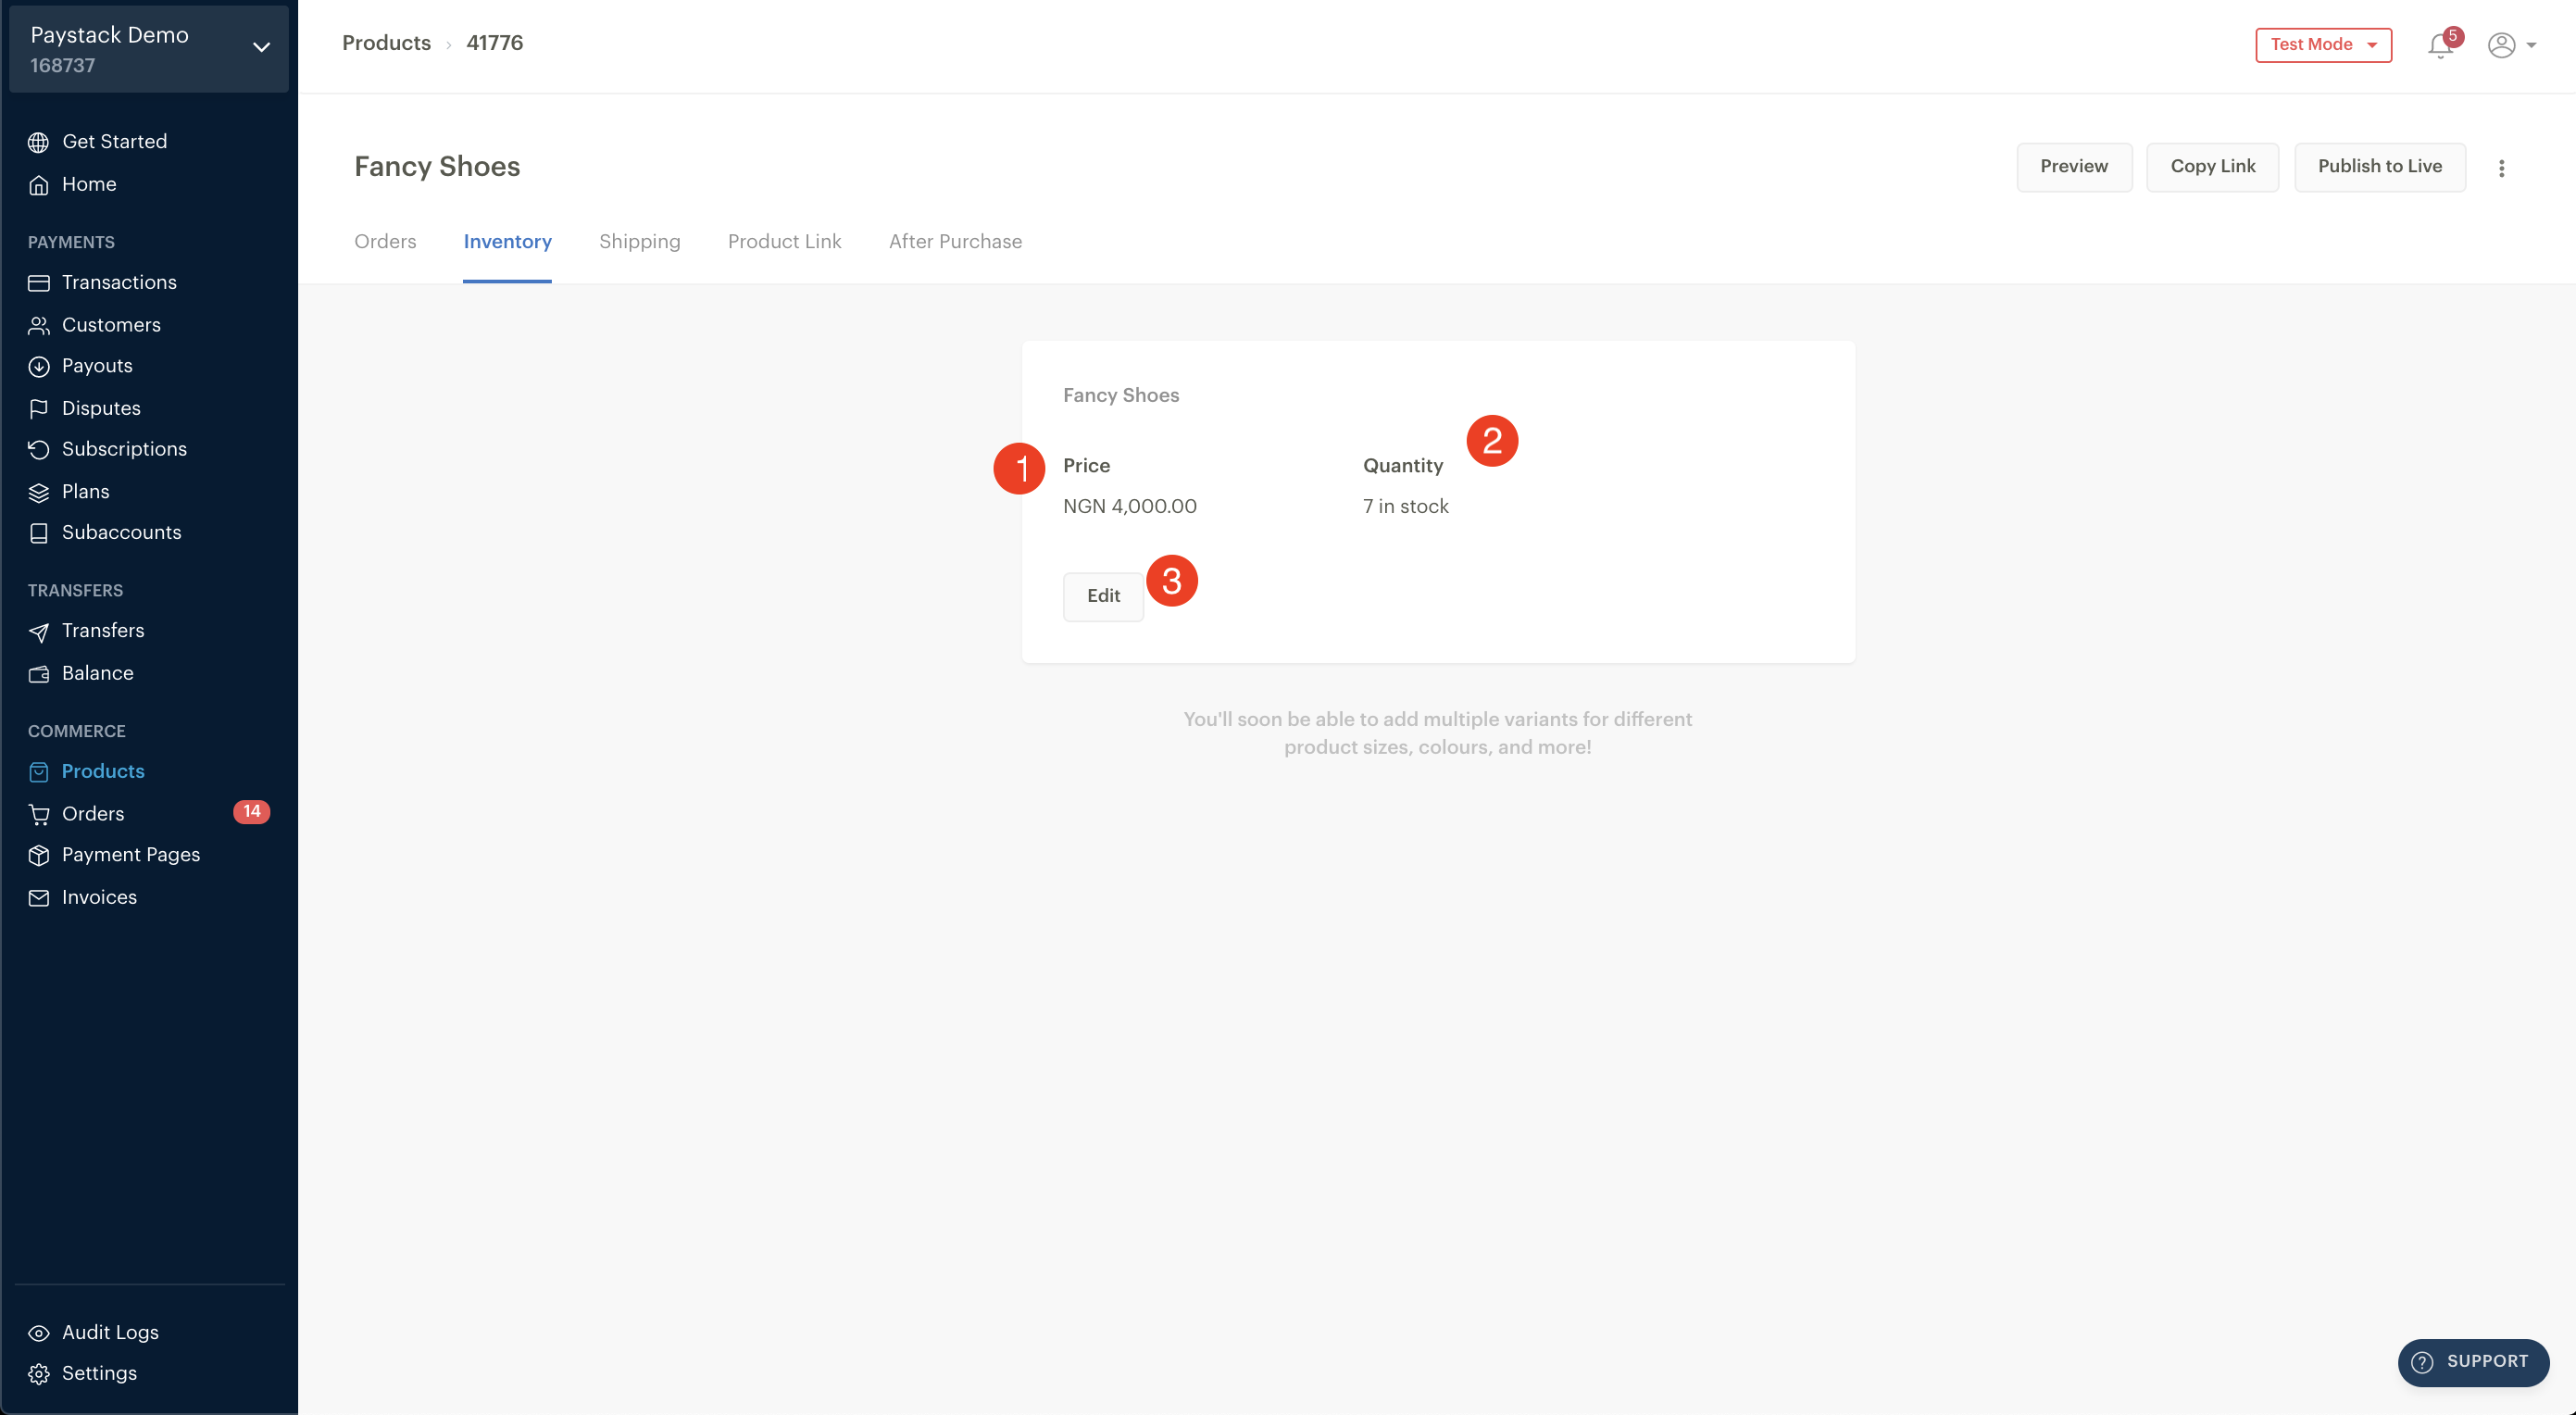
- Price: This shows the price of the product
- Quantity: This shows how much of the product you have left in stock
- Edit: You can edit the product price and quantity here
3. Shipping
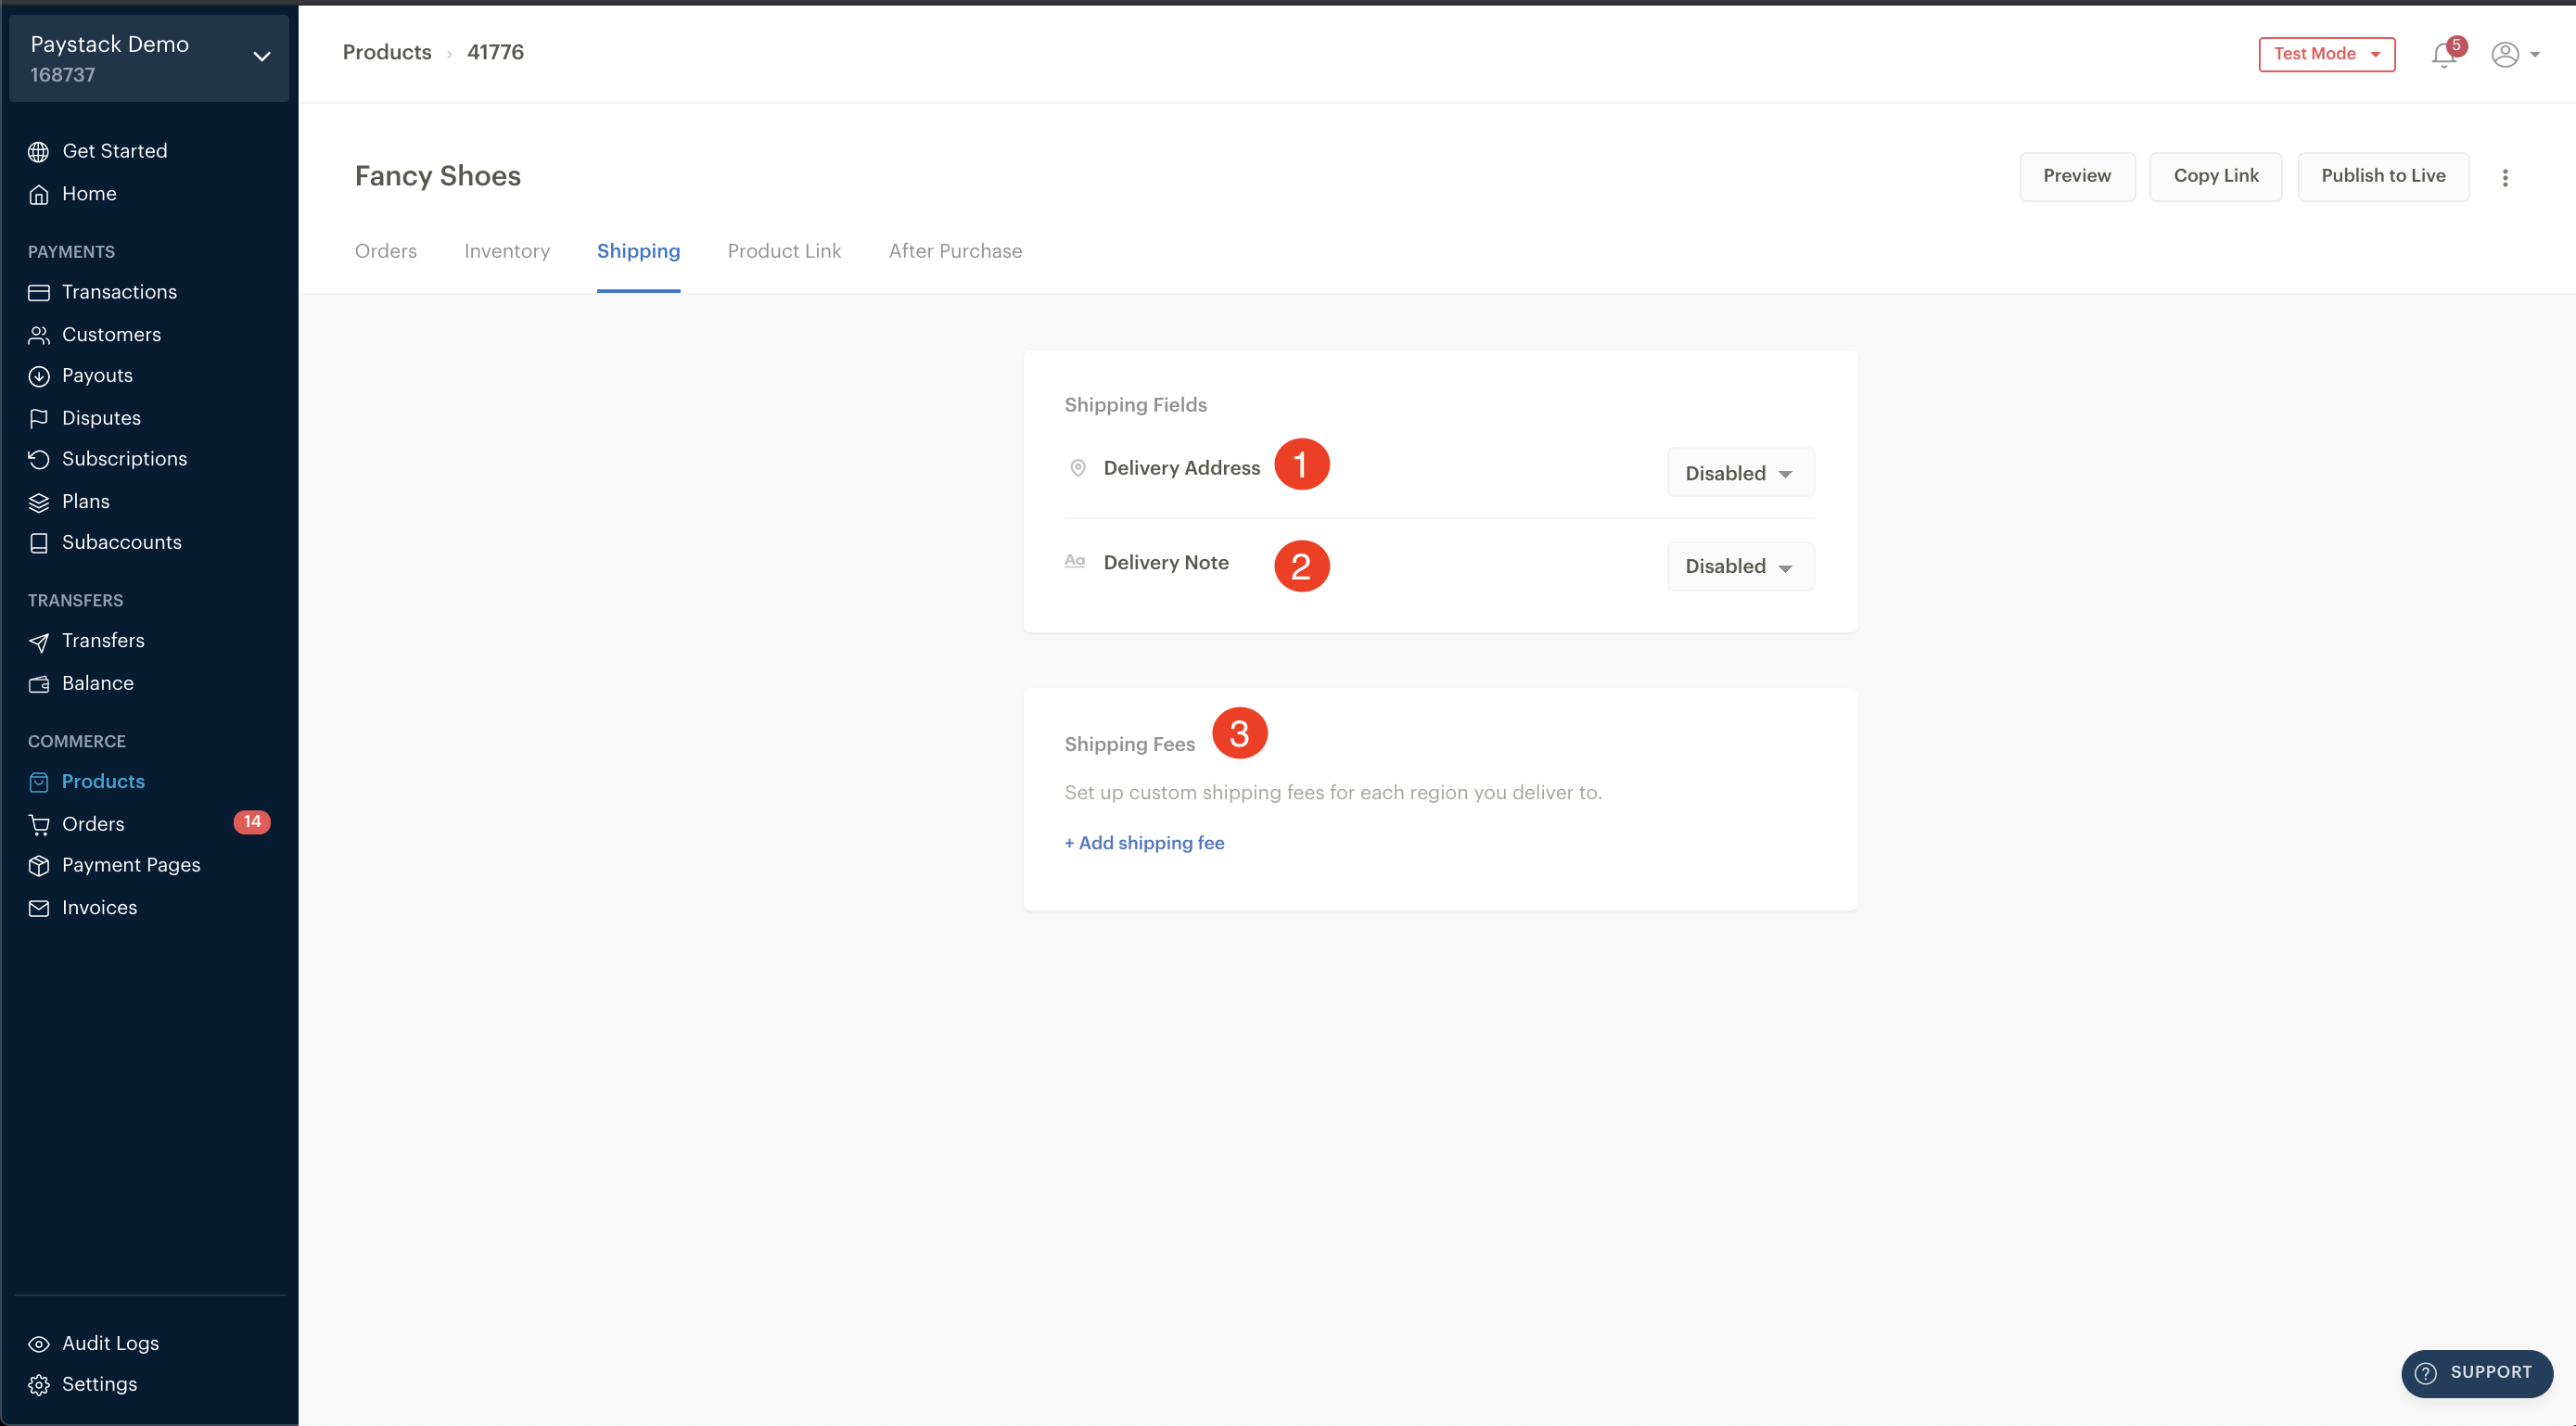
- Delivery Address: You can set the Delivery Address field as Disabled or Required. Disabling Delivery Address means your customers won't be prompted to enter their delivery address when they pay. Setting this as Required means they would need to enter their delivery address for them before going ahead with payment.
- Delivery Note: This lets you set the Delivery Note field as Disabled, Required or Optional. The delivery note can be for specific delivery instructions from the customers or requests from the customers. Setting this field as required means customers have to enter a delivery note. However, if this is set to optional, your customers can choose not to provide this.
- Shipping Fees: This is where you set the shipping fee for your products. You can set different shipping fees for different locations and have your customers choose their location.
4. Product Link
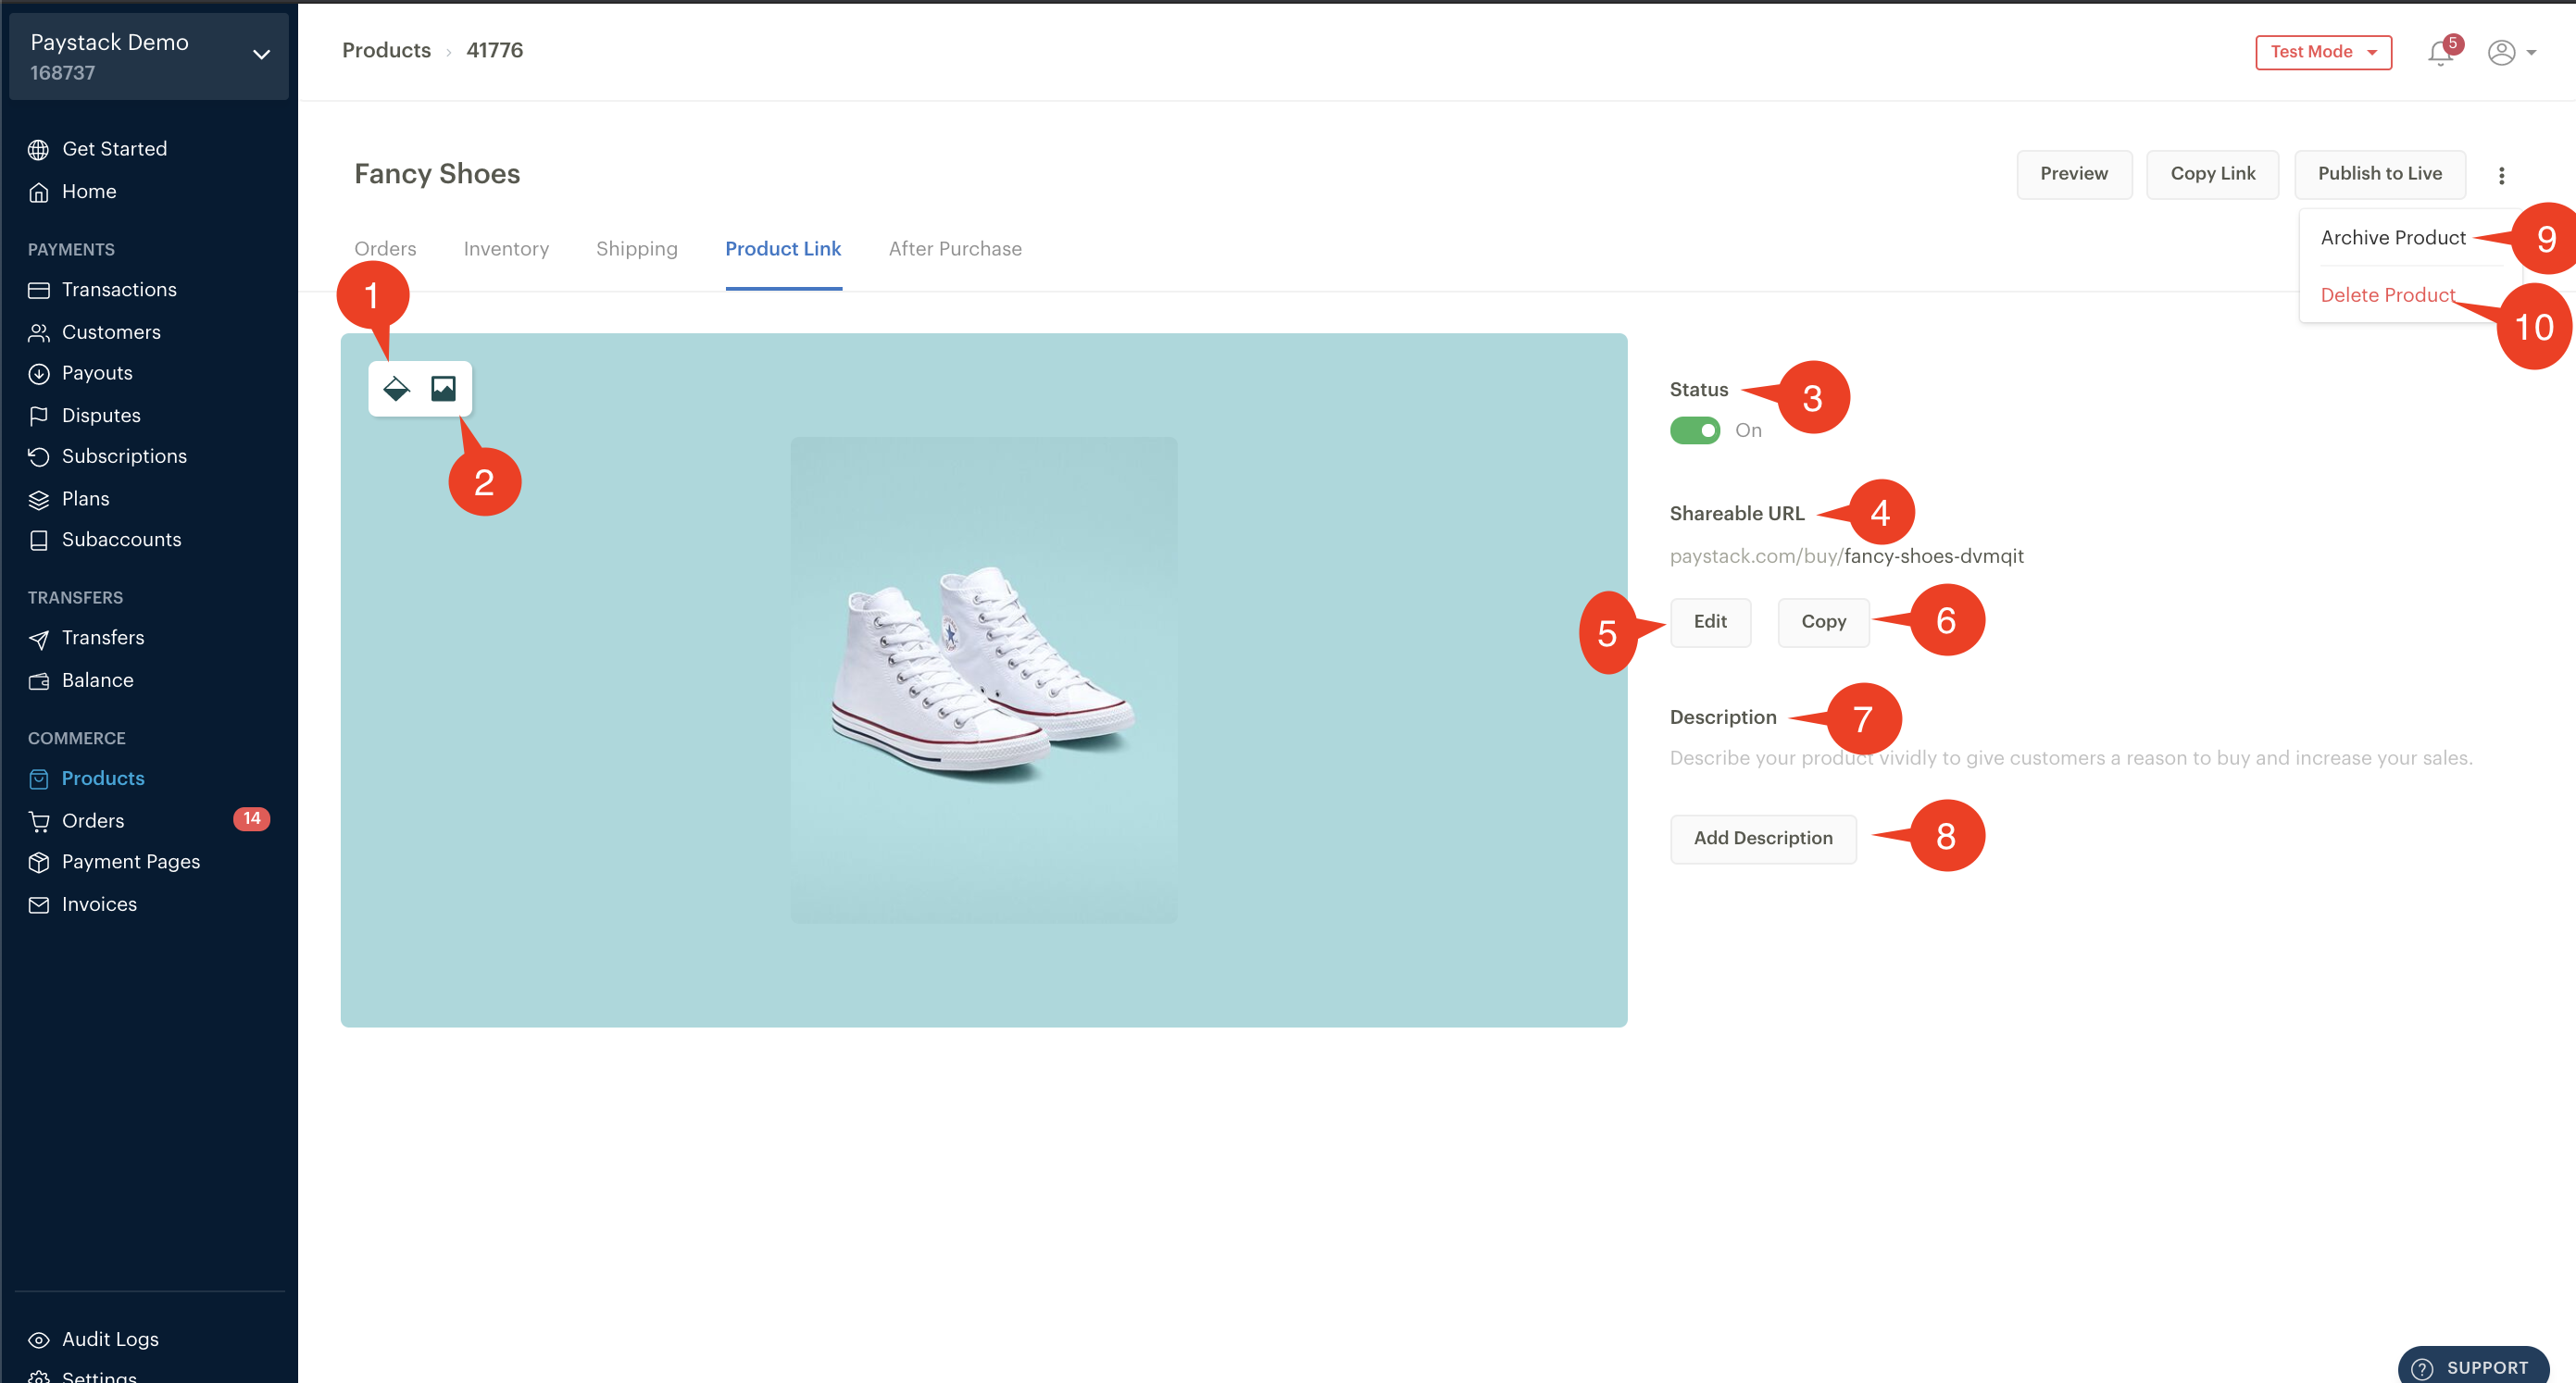
- Background Colour: This lets you select the background colour of your Product
- Images: You can add pictures and videos of your products here
- Status: This lets you set your product status as Active or Archived
- Shareable URL: This is a direct link to your product, which can be shared with a customer to purchase it
- Edit: This lets you edit your product URL
- Copy: You can copy the product URL with a click of this button
- Description: This shows the product description your customers would see when they view your Product link
- Add Description/Edit: This lets you add a description for your product. If your description has already been inputted, the button you'll see is the "Edit" button
- Archive product: This sets the status of your product as inactive. Your customers won't be able to pay you with this link but you'll have access to information on this product on your dashboard
- Delete product: Here you to delete your product. Please note that this action is permanent and you won't have access to any information on this product once you've deleted it
5. After Purchase
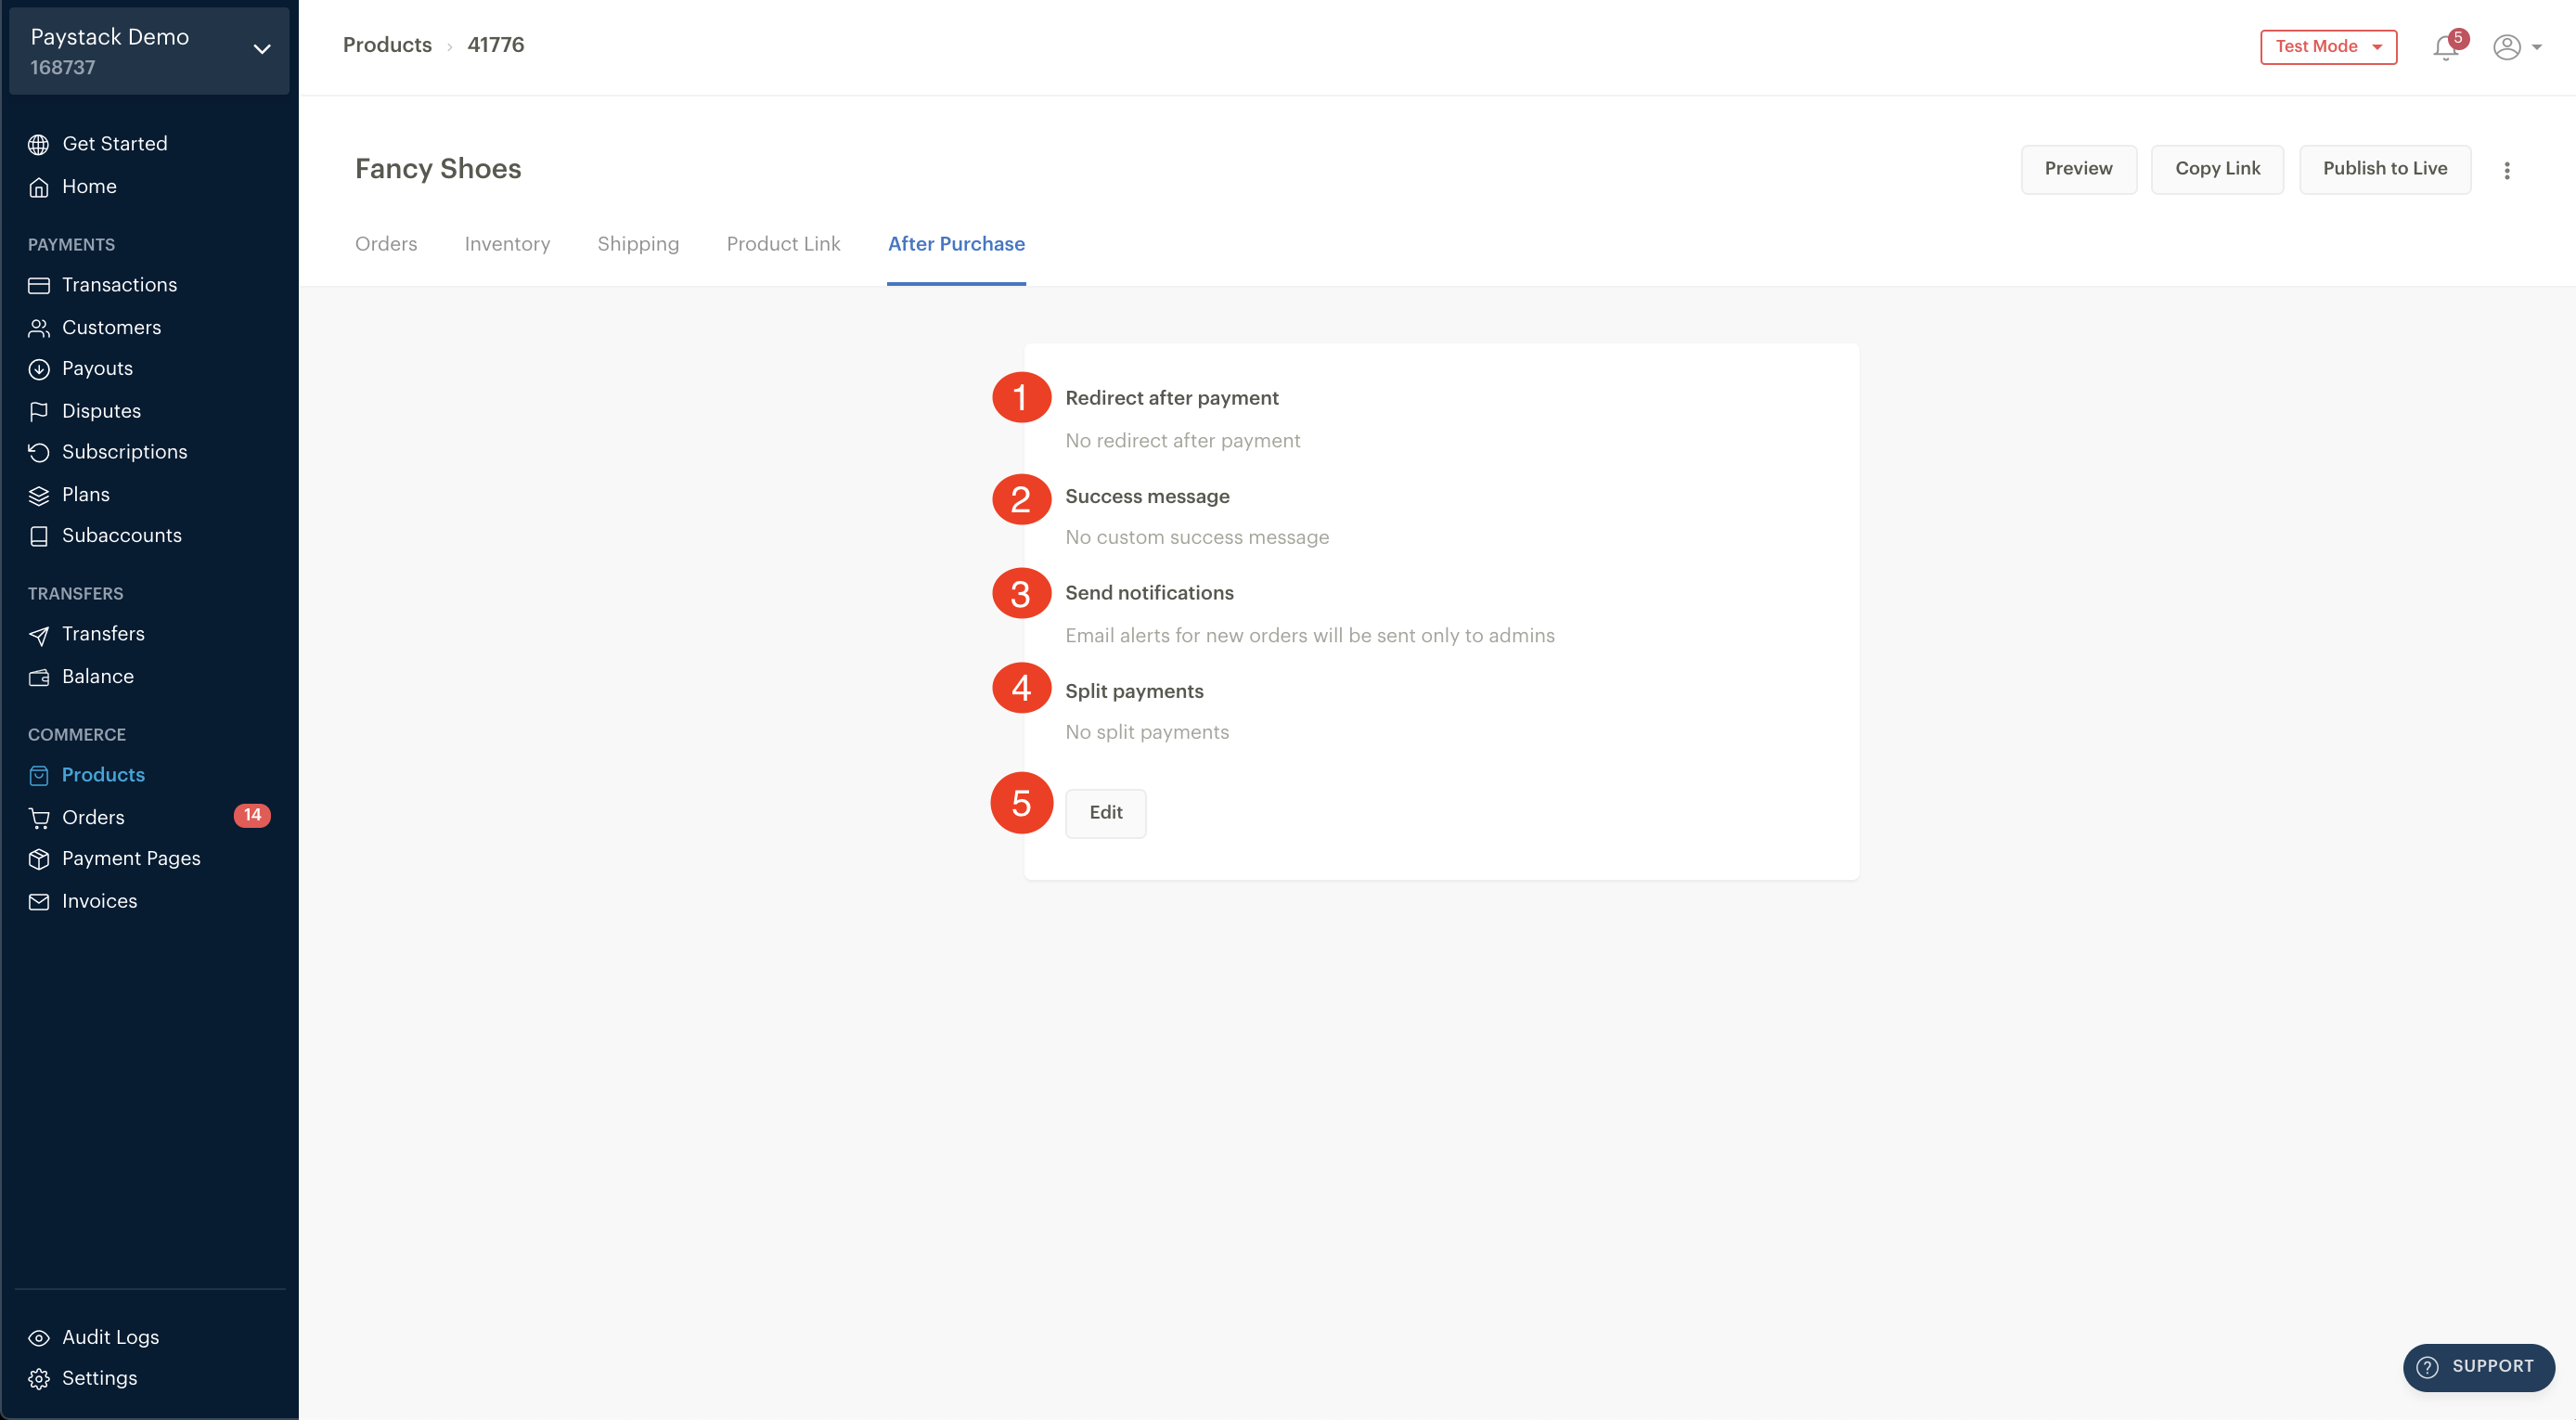
- Redirect after Payment: The link you enter in this filed is where customers are redirected to after a successful transaction. By default, after a customer completes a successful transaction, they remain on the 'Thank You' page. Entering a URL here ensures the customers are redirected after payment
- Success message: Here you can see set a post transaction message which customers would see after a successful transaction
- Send notification: This is a direct link to your product, which can be shared with a customer to purchase it
- Split payments: This lets you split money received from the transaction made from this page between your account and another Nigerian bank account. For this to work, you'll need to first create a Subaccount. Please see this article for more information on Split payments: Split payments
- Edit: Clicking on this button lets you edit any of the fields here
For information on how to create and sell Products read this article: How do I sell Products on Paystack?

Comments
0 comments
Article is closed for comments.